File size fixes
PNG File Too Large? Here’s Why and How to Fix It
A large PNG is not always a bad PNG. The fix depends on whether you need transparency, sharp screenshot detail, a smaller website file, or a strict upload limit.
01
Quick answer
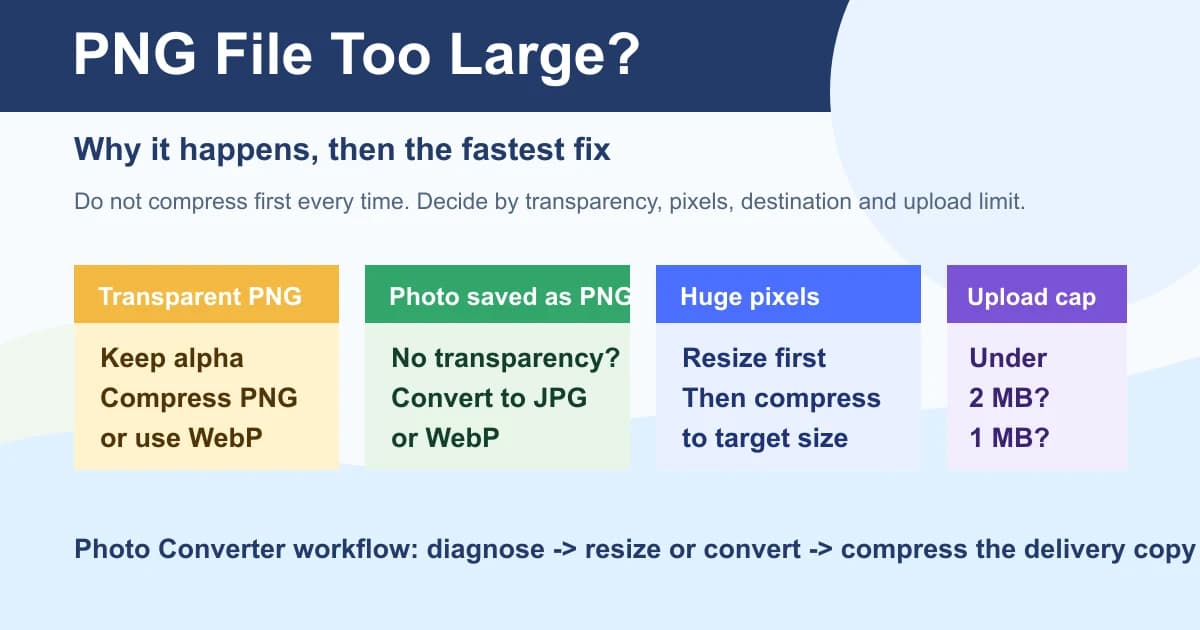
If a PNG file is too large, I do not compress it blindly first. I ask what the next system needs. A transparent logo, a screenshot, a product photo and an upload form under 2 MB need different fixes.
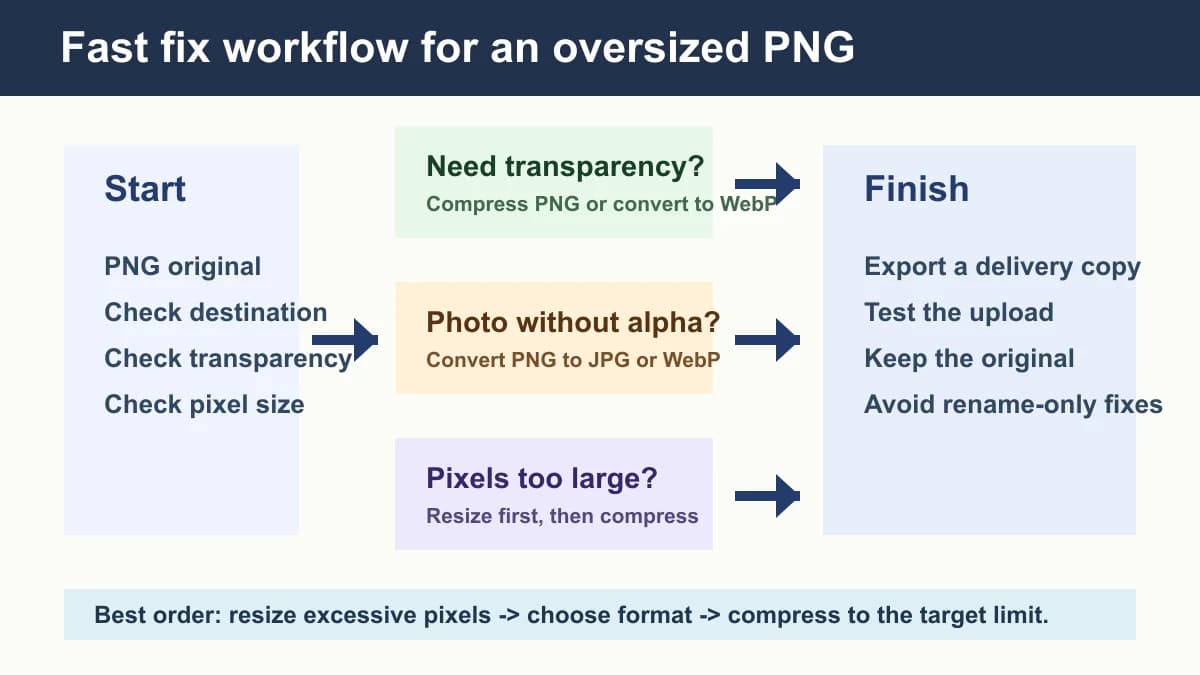
My rule is simple: keep PNG when transparency or sharp UI detail matters; convert PNG to JPG when it is really a photo without transparency; convert PNG to WebP for modern website delivery; resize before compression when the pixel dimensions are larger than the destination will ever show.
If the destination gives a hard limit such as under 5 MB, 2 MB, 1 MB or 500 KB, make a delivery copy and reduce that copy to the target. Keep the original untouched.
| What you see | Most likely cause | Best first fix | Tool |
|---|---|---|---|
| Transparent PNG is too big | Alpha channel must be preserved | Compress PNG or convert to WebP if accepted | Compress PNG / PNG to WebP |
| Photo saved as PNG | Wrong delivery format for a photo | Convert to JPG or WebP | PNG to JPG / PNG to WebP |
| Screenshot is huge | Many exact pixels and sharp edges | Crop or resize first, then compress | Resize Image / Compress PNG |
| Upload says file too large | Hard MB or KB limit | Reduce a copy to the exact target | Reduce Image Size |
Useful links
- ToolCompress PNGUse when PNG is still the right format and only needs to be smaller.
- ToolConvert PNG to JPGUse when the image is a photo and transparency is not needed.
- ToolConvert PNG to WebPUse for website delivery when the CMS accepts WebP.
- ToolReduce Image SizeUse when the destination names a strict target such as 2 MB or 500 KB.
02
Why PNG gets large
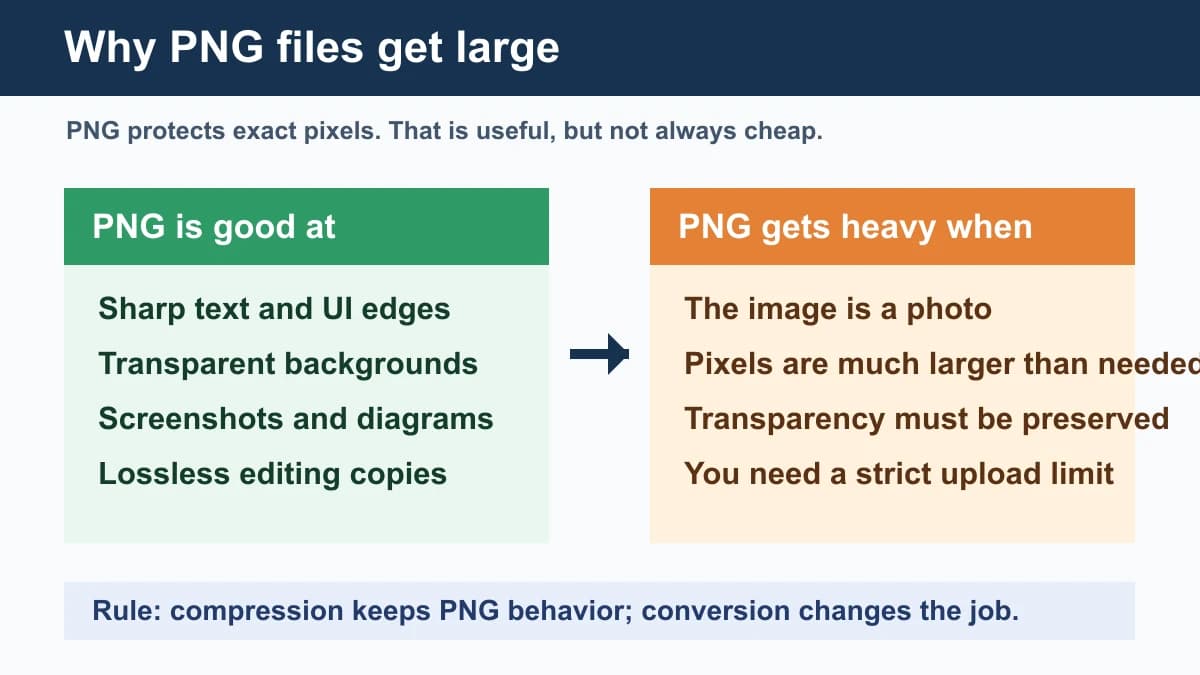
PNG is designed to preserve exact image data. The W3C PNG specification describes PNG as a lossless format, and that single word explains many file-size surprises: PNG does not throw away photo detail the way JPG-style delivery can.
That is why PNG is excellent for screenshots, interface graphics, diagrams, icons and transparent edges. The same strength becomes a cost when you save a camera photo, product lifestyle photo or full-page screenshot as PNG.
MDN’s image format guide also frames PNG as a strong choice for lossless and transparency needs, while WebP supports lossy and lossless compression plus transparency. The practical lesson is not “PNG bad.” It is “PNG should match the job.”
03
Compress or convert?
Compression asks: can I keep this PNG and make it smaller? Conversion asks: is PNG the wrong delivery format for this destination? Mixing those two questions is the most common reason people waste time.
If the file is a logo, UI screenshot or transparent product cutout, I usually try PNG compression first. If the file is a photo with no transparent background, I usually convert PNG to JPG. If the file is for a website and the CMS accepts it, I prefer WebP because Google describes WebP as a format that provides lossy and lossless compression for web images.
The exception is a hard upload target. If a form says the image must be under 2 MB, I do not argue about the perfect format. I make a copy, pick the safest accepted format, and reduce the output until it fits.
| Decision | Use it when | Avoid when |
|---|---|---|
| Compress PNG | You need transparency, crisp text, or the uploader requires PNG | The file is really a photo without alpha |
| PNG to JPG | Photo-style image, email attachment, conservative upload form | Transparency or sharp flat graphics matter |
| PNG to WebP | Website delivery and CMS supports WebP | The destination rejects WebP |
| Resize first | The image is much wider or taller than needed | The pixel size is already correct |
04
Handle transparency carefully
Transparent PNGs are the place where bad advice causes visible damage. If a logo, sticker, product cutout or UI asset needs a transparent background, converting straight to JPG will remove that transparency because JPG does not carry an alpha channel.
In that case, I would first compress the PNG. If the destination is a website that accepts WebP, I would test PNG to WebP and inspect the edges on a non-white background. If the destination is an upload form that only accepts JPG, add a deliberate white or brand-color background instead of letting the transparency turn black or dirty.
This is also why I keep transparent source files separate from delivery copies. One copy can be a compressed PNG, another can be WebP for the site, and another can be JPG with a controlled background for platforms that refuse transparency.
- Need transparency: compress PNG first, or use WebP only when accepted.
- No transparency needed: JPG is often a simpler delivery copy.
- Transparency rejected by a form: add a real background before exporting JPG.
05
Resize before compression
A 5000-pixel-wide PNG can stay large even after compression because there are simply too many pixels. If the image will be displayed at 1200 pixels wide, compressing the 5000-pixel version first wastes effort.
This matters for screenshots and design exports. Retina screenshots, Figma exports, app mockups and full-page browser captures often contain more pixels than an upload form, email, CMS thumbnail or product page needs.
My sequence is destination width first, then format, then compression. Resize does change pixels, so inspect text, face detail and logo edges after export. But when the original dimensions are excessive, resizing is usually the cleanest size reduction.
06
Use the destination workflow
The same oversized PNG can need different exports. For an upload form, compatibility usually beats theoretical page-speed optimization. For a website, page weight matters more because every visitor downloads the image. For email, smaller attachments reduce friction. For a product store, image clarity and load speed both matter.
If your original problem is an upload rejection, read the broader image upload failed checklist as well. File size is one reason, but format support, dimensions, metadata, filename rules and server timeouts can create the same symptom.
For web publishing, I usually create a WebP version for the site, keep PNG only when transparency or sharp graphics require it, and keep a JPG fallback for workflows that reject WebP. For forms, I usually use JPG for photos and PNG only when the form accepts it and transparency matters.
07
Tools I would use
For Photo Converter, I would keep the first three tools close: Compress PNG, PNG to JPG, and PNG to WebP. Those match the three real reasons people search this topic: keep PNG but smaller, change a photo-style PNG into a smaller JPG, or publish a lighter website image.
Then I use Resize Image or Reduce Image Size only when the problem is not really PNG itself. If the pixels are huge, resize. If the destination says under 2 MB or 500 KB, reduce to the target. If you are not sure which output format is accepted, use Image Converter and make a clean delivery copy.
| Need | Tool | Why |
|---|---|---|
| Keep PNG behavior | Compress PNG | Preserves transparency and sharp graphics better than converting blindly |
| Photo PNG is too heavy | PNG to JPG | JPG is usually a better delivery format for photos without alpha |
| Website PNG is too heavy | PNG to WebP | Useful when the website accepts WebP and page weight matters |
| Exact upload limit | Reduce Image Size | Targets a hard file-size cap instead of guessing |
FAQ
FAQ
- Why is my PNG file so large?
- PNG is lossless and can preserve transparency, sharp text and exact pixels. That is useful, but photos, huge screenshots and oversized design exports can become large as PNG.
- Why is PNG larger than JPG?
- JPG uses lossy compression that can discard detail to reduce file size. PNG is lossless, so it usually stays larger for photo-like images.
- Should I convert PNG to JPG?
- Yes if the image is a photo and does not need transparency. No if it is a logo, screenshot, UI graphic or transparent cutout where sharp edges or alpha matter.
- Should I convert PNG to WebP?
- Use WebP for website delivery when the CMS and target workflow accept it. Keep PNG or JPG copies for forms, partners or older workflows that reject WebP.
- How do I make a PNG under 2 MB or 1 MB?
- Resize first if the pixels are larger than needed, then compress PNG or convert to JPG/WebP depending on transparency and destination support. Use target-size reduction when the limit is strict.
- Why is my PNG still large after compression?
- The image may have too many pixels, complex photo detail, or required transparency. If compression stalls, resize first or convert a delivery copy to JPG/WebP when the destination allows it.
- Can I reduce PNG size without losing transparency?
- Yes. Start with PNG compression. If the destination supports it, WebP can also preserve transparency. Do not convert to JPG unless you add a deliberate background.
- Is PNG best for screenshots?
- PNG is often good for screenshots because it keeps text and UI edges sharp. For very large screenshots on a website, resize, crop, or convert to WebP if the destination supports it.
 Compress PNGCompress PNG online for free. Choose lossy palette quantization or lossless optimization to reduce file size while preserving transparency and sharp edges.
 PNG to JPG ConverterConvert PNG to JPG locally in your browser for free. Control output quality and flatten transparency onto white. No upload or signup; download JPG in seconds.
 PNG to WebP ConverterUse our PNG to WebP converter to create smaller website images in your browser. Adjust quality, preserve transparency, and download privately with no signup.