Upload workflow
Image Upload Failed? 7 Reasons Your Photo Is Being Rejected
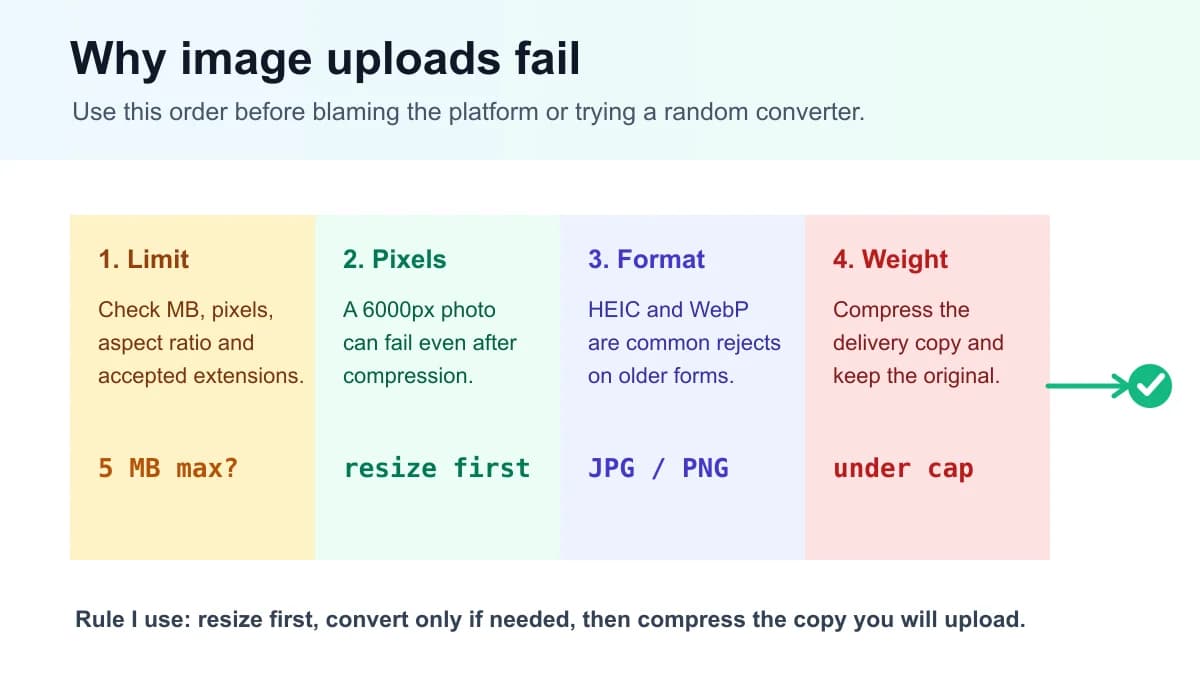
When an image upload fails, I do not start by changing the filename or trying ten random tools. I check the destination limit, resize the pixels, convert to a safe format, then compress the delivery copy.
01
The 7 reasons at a glance
The search phrase “image upload failed” sounds technical, but the cause is usually not mysterious. A large website, job form, CMS, marketplace or business profile often rejects a file because it is outside a practical boundary.
My rule is simple: diagnose first, then choose the tool. Unsupported format means convert. File size means compress or reduce to a target. Dimensions mean resize. A sideways photo means orientation. A stuck upload may be browser, server, network or a damaged file.
If the error message is vague, use the table below. It turns one broad problem into seven practical checks before you upload the same file again.
| Problem | Likely cause | Fix | Best tool |
|---|---|---|---|
| File is too large | MB limit or server timeout | Compress a delivery copy after resizing | Compress Image |
| Image dimensions are too big | Pixel cap, aspect ratio or memory limit | Resize width and height before compression | Resize Image |
| Unsupported image format | HEIC, WebP, AVIF or SVG not accepted | Convert to JPG or PNG for forms | Image Converter |
| Preview looks fine but upload fails | Metadata, filename or hidden format mismatch | Export a clean copy with a simple name | Reduce Image Size |
| Portal asks for one file | Separate images are not accepted | Merge the images into a single PDF | Images to PDF |
| Photo appears sideways | EXIF orientation was not handled by the uploader | Rotate or export a corrected copy | Rotate Image |
| Upload stuck or invalid image | Browser, server, network, metadata or corrupted file | Try another browser, export a clean copy, then compress | Image Converter |
02
Big sites reject practical mistakes
The fastest way to fix a failed upload is to stop guessing and look for the destination rule. Big platforms usually care about accepted file type, minimum and maximum dimensions, file weight, moderation rules and whether the image is visually useful.
Google Business Profile is a good example because the public help page is specific: business photos should be JPG or PNG, between 10 KB and 5 MB, recommended at 720 x 720 pixels, and at least 250 x 250 pixels.
That does not mean every platform uses the same numbers. Product feeds, WordPress media libraries, marketplaces, government forms and school portals can all use different limits. The useful habit is the same: make a fresh upload copy for the destination instead of fighting the original file.
- For forms: JPG and PNG are the safest fallback formats.
- For iPhone photos: convert HEIC to JPG before uploading to older or strict forms.
- For CMS uploads: use WebP only when the media library clearly accepts it; keep JPG or PNG as the safer fallback.
Useful links
- SourceGoogle Business Profile photo guidelinesOfficial source for JPG/PNG, 10 KB to 5 MB, 720 x 720 recommended, 250 x 250 minimum.
- SourceGoogle Merchant Center image requirementsOfficial product image requirement reference for shopping feeds and listings.
- SourceWordPress.com accepted file typesOfficial media-library reference for formats a WordPress.com site accepts.
- ToolConvert HEIC to JPGUse this when an iPhone image fails in an older upload form.
- ToolConvert WebP to JPGUse this when a strict form or marketplace refuses WebP.
03
Resize before you compress
This is the step people skip. Compression changes how pixels are encoded. Resizing changes how many pixels exist. If your phone photo is 4032 x 3024 and the upload slot only needs a 1200px image, compression alone is the wrong first move.
For upload failures, resizing usually solves two problems at once: it reduces memory pressure during upload and creates a file that is closer to what the destination will display. After that, compression can do its job without destroying detail.
For upload forms, the same rule applies across profile photos, product photos and document portals. Make the copy close to the requested size first, then decide whether JPG, PNG or PDF is the safer delivery format.
Useful links
04
Format fixes by destination
Format choice is not about which file type is “best” in isolation. It is about the place where the image has to survive. A strict upload form may prefer boring JPG. A product page may benefit from WebP. A logo handoff may need SVG plus PNG export. A document portal may want a PDF.
The mistake I see most often is treating WebP or HEIC as universally better. They are efficient formats, but an upload endpoint can still reject them. When the destination is unknown or conservative, make a JPG or PNG copy first.
| Destination | Safer format | Avoid first |
|---|---|---|
| Unknown form or profile | JPG for photos, PNG for transparent graphics | HEIC, AVIF, sometimes WebP |
| CMS media library | JPG or PNG unless WebP is explicitly accepted | Assuming browser support means upload support |
| iPhone photo upload | JPG copy | Raw HEIC in strict forms |
| Document submission | PDF when pages must stay fixed | Loose image files if order matters |
Useful links
- ToolHEIC to JPG for uploadsUse this for iPhone photos rejected by forms or portals.
- ToolWebP to JPG fallbackUse when the browser shows the image but the upload form refuses it.
- ToolConvert PNG when neededUse only when the target CMS or upload form clearly accepts the new format.
- ToolImages to PDF for submissionsUse when the upload asks for one ordered document instead of separate images.
05
Make a clean upload copy
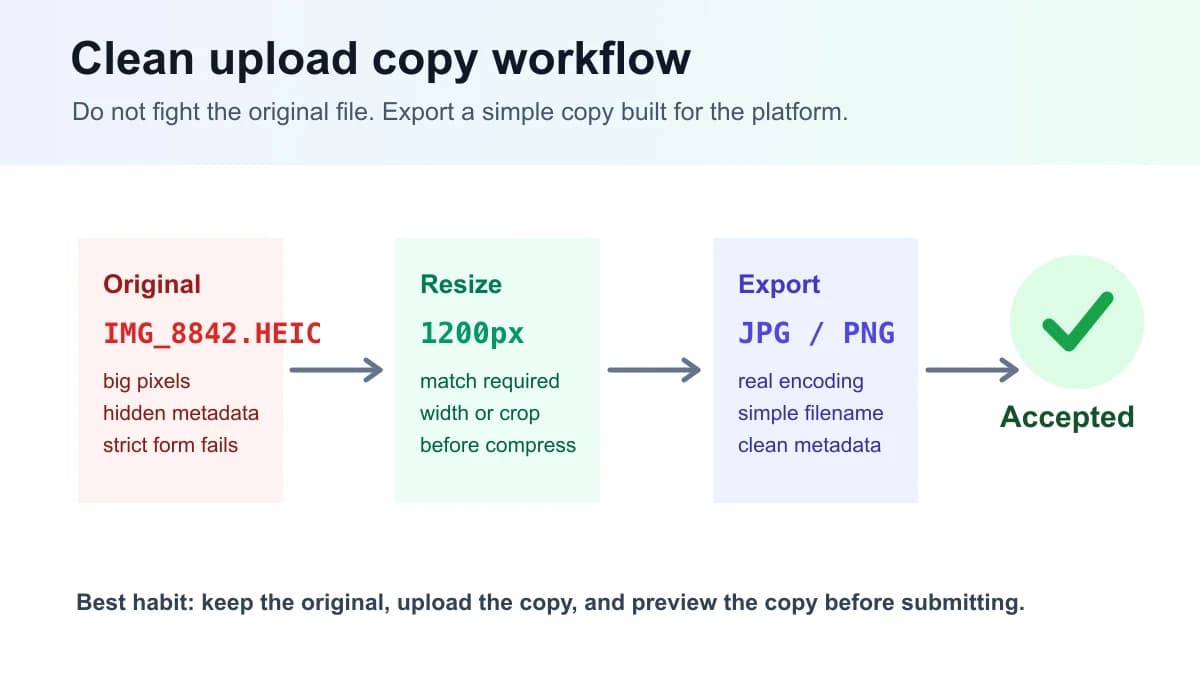
When an upload keeps failing after the obvious size and format checks, I stop editing the original and create a clean copy. This avoids hidden problems such as a strange filename, oversized metadata, broken EXIF rotation, an alpha channel the form does not expect, or a file extension that does not match the real image data.
The clean copy should be boring on purpose: lowercase filename, hyphens instead of spaces, real exported JPG or PNG data, no unnecessary metadata, and dimensions close to the platform requirement.
This is especially useful for school portals, visa forms, application systems, profile photos and marketplace uploads. Those systems often give a generic error, but they are really asking for a simple, predictable file.
06
My safe upload workflow
This is the workflow I use when I have to prepare images for a client CMS, profile page, marketplace listing or form that cannot fail at the last minute.
Keep the original untouched. Make a copy named for the destination, such as product-main-jpg, google-business-logo-png or application-photo-jpg. Then resize, convert and compress that copy. Finally open the exported file at the size the platform will show.
That last preview step matters. A file can pass the uploader but still look soft, show a dirty transparent edge, lose EXIF rotation, or become unreadable on a small screen. Upload success is not the same as publish quality.
- Destination first: form, CMS, product page, business profile or PDF.
- Pixels second: resize to the real display or platform requirement.
- Format third: JPG/PNG for conservative upload, WebP only when the uploader accepts it.
- Weight last: compress until the file is under the limit and still readable.
Useful links
07
Tools I would use
I would not send every failed image to the same tool. The right choice depends on the failure. If the file is too heavy, compress it. If the pixels are huge, resize it. If the format is rejected, convert it. If the photo uploads sideways, rotate or export a corrected copy.
For Photo Converter, the cleanest path is three tools first: Compress Image for file weight, Resize Image for pixel dimensions, and Image Converter for format compatibility. Use HEIC to JPG, WebP to JPG or Images to PDF only when that exact upload requirement appears.
| Use case | Best first move | Tool |
|---|---|---|
| Upload file is too heavy | Resize to the required dimensions, then compress | Compress Image |
| Upload form rejects iPhone photo | Convert HEIC to JPG | HEIC to JPG |
| CMS rejects WebP | Export a JPG fallback | WebP to JPG |
| Application asks for one file | Merge images into a PDF | Images to PDF |
FAQ
FAQ
- Why does my image upload keep failing?
- Most failed uploads come from file size, pixel dimensions, unsupported format, server timeout, metadata, filename rules or platform moderation. Check the destination limit first, then resize, convert and compress.
- Should I resize or compress first?
- Resize first when the original is much larger than the destination. Compression should usually happen after dimensions are reasonable.
- What image format is safest for upload forms?
- JPG is usually safest for photos and PNG is safest when transparency or sharp graphics matter. Use WebP only when the destination clearly accepts it.
- Why does an iPhone HEIC photo fail to upload?
- HEIC is efficient, but some older forms, CMS tools and document portals still accept only JPG or PNG. Export a real JPG copy instead of renaming the extension.
- Can I fix upload failed by renaming the file extension?
- Usually no. Renaming changes the filename, not the encoded image data. If the form needs JPG or PNG, export a real JPG or PNG copy.
- Why does a WebP image upload fail?
- Some forms, marketplaces and older CMS workflows still allow only JPG, PNG or GIF. If WebP fails, export a JPG copy for photos or a PNG copy when transparency matters.
- What size should Google Business Profile photos be?
- Google says business photos should be JPG or PNG, 10 KB to 5 MB, recommended at 720 x 720 pixels, and at least 250 x 250 pixels.
- How do I compress an image under 1 MB or 500 KB?
- Resize the image first if the pixels are much larger than needed, then use target-size compression. Keep checking the exported copy so text, faces and logos remain clear.
 Compress ImageCompress image files online while keeping JPG, PNG or WebP output. Choose quality, compare file sizes, and download privately. Free to start, no signup.
 Resize ImageResize Image locally in your browser for free. Set exact width and height, preserve proportions, and export JPG, PNG, or WebP. No upload or signup required.
 Image ConverterUse our Image Converter to change JPG, PNG, WebP, AVIF, GIF, BMP or TIFF files online. Choose JPG, PNG, WebP, AVIF or GIF output in seconds—no signup.